Homemade Beef Jerky & Hamilton Beach® Food Dehydrator Review

Not all counter-top appliances were created equal. When I first started cooking I was all about getting a hold of the latest gadgets and gizmos for my kitchen. The flip-able pancake pan? Check! The active-fry minimum oil fryer? Sign me up! A combination sandwich maker, coffee brewer, and pizza oven? Yes! Yes! Yes!

What I soon learned was that more kitchen appliances is not the merrier. The pancake maker never made great pancakes. When you flip the pan over, the side that had been face up is stone cold and is no position to been cooking your pancake. The minimum-oil french fry maker takes up half the counter space in the kitchen, takes an hour to make french fries, and they taste like, well, french fries that took an hour and weren’t made with any oil. So, yes, as a consumer I often get excited by the late night tv ads showing “must have” products du jour. But sometimes all you need to cook pancakes is a frying pan; and sometimes you need to fry your damn french fries in oil or don’t have french fries to begin with.

All of this is to tell you, I don’t like collecting kitchen appliances for the sake of having them. I’ve learned my lesson over the years. So many appliances collect dust in my basement until I finally give them away. So, when I tell you I can’t live without my food dehydrator – I’m speaking from a place of self-awareness. I’ve fallen for many a pretty juice maker and set of Ginsu knives.

Beef jerky is simply one of the greatest snacks ever invented. It’s beef. It’s delicious. It doesn’t need refrigerating. My kids LOVE it. And did I mention it’s beef? Beef you can travel with in your pockets.

Making beef jerky at home without a dehydrator is not impossible. I’ve made the recipe below in the past without one. You can turn your oven really low and use that but the temperature isn’t quite low enough and the beef cooks as much as it dries out. For me this sometimes results in moldy beef jerky a week after it’s made. An expensive investment with the current price of beef. I’ve also made jerky by rigging up a box fan and laundry basket, drying the beef out in my own mini wind tunnel. But it takes some work, and my wife curses me out every time she goes to fold socks and the laundry basket smells like a butcher’s shop…

HB3

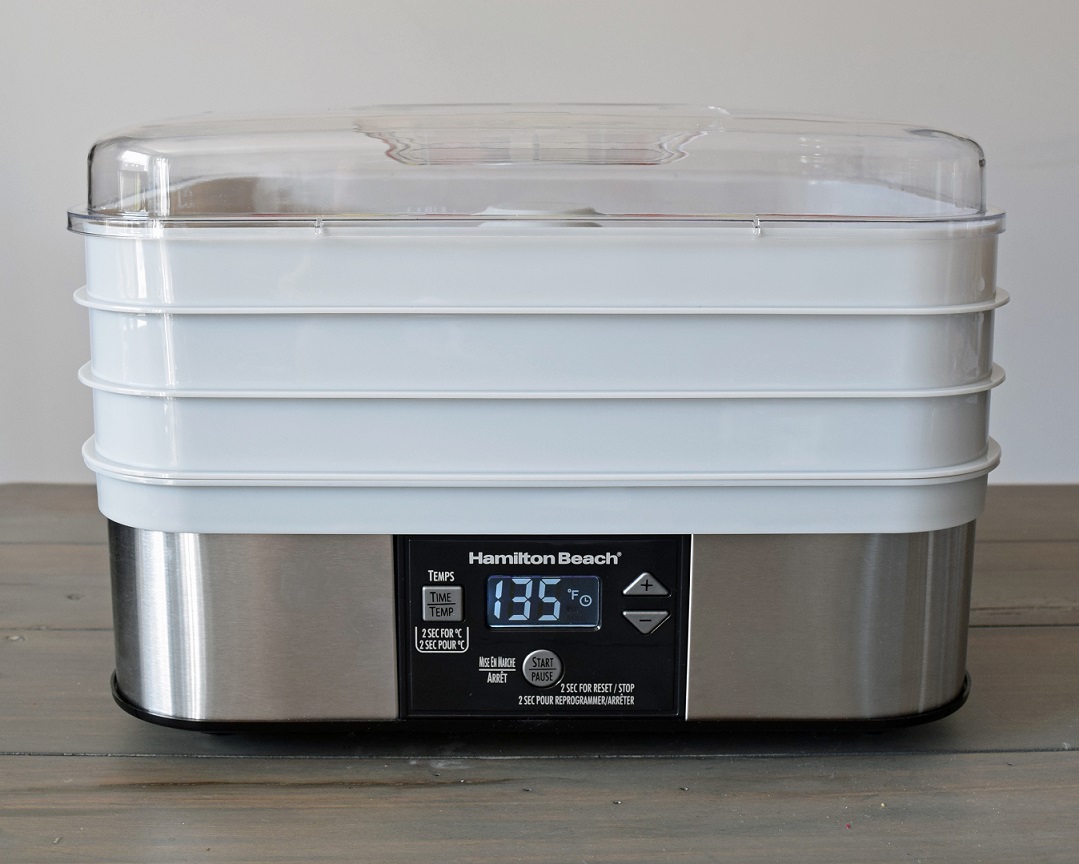
The beauty of a food dehydrator is that it’s multi-layered (meaning you can do a lot of beef at one time), and it does one thing and does it damn well. It slowly dries your beef in a safe environment and ensures perfect results every time. That leaves you time to dream up ways of hiding the delicious results from your kids.  My Hamilton Beach Food Dehydrator has five stackable layers with continuous airflow and an adjustable thermometer. So there is no need to rotate the beef or babysit it. I set it and come back four hours later to see how things are progressing.

HB2

Ingredients:

4 pounds lean brisket – have your butcher thinly slice the meat with the grain, into long strips. Meat slices should be no more than 1/4 inch thick.
1 1/3 cup Worcestershire sauce
1 1/3 cup soy sauce
2 tablespoon honey
4 teaspoons freshly ground black pepper
4 teaspoons onion powder
2 teaspoon red pepper flakes

Preparation:

  1. Place the strips of meat along with all of the remaining ingredients into a large zip-lock bag and mix to incorporate all of the ingredients. Place the bag in the refrigerator for 6 hours.
  2. Remove the meat from the marinade and pat dry with paper towel.
  3. Place beef slices in a single layer on the first tray, leaving space around each slice for proper drying. Fill trays with remaining beef slices.
  4. Stack trays on base with the top tray last. Set the dehydrator to 160°F for 4 to 8 hours. Start checking beef for doneness at 4 hours and then every 30 minutes. Jerky is dry when you can bend it and and the top cracks, but the slice does not break.
  5. Pat jerky dry with a paper towel to remove any surface fats and cool completely before storing in an airtight container.
  6. If jerky has been properly dried, cooled, and packaged, it may be stored up to 2 months in an airtight container at room temperature.


Photo credit: stalkerville.net

Homemade pasta

pasta bowl

Yes – I made that bucatini pasta from scratch!

Recently I went on a culinary trip to Italy. I knew before I stepped foot on the plane that the food there would be amazing, and it was. What I wasn’t prepared for was the beauty in the sheer simplicity of Italian eating. Dishes focused on great ingredients that are not complicated by additions to the plate. Fresh, seasonal produce that speaks for itself in flavour and freshness. It really reminded me a lot of why it is that I’m on this food journey to begin with.

Sure I love making and eating delicious food. But it’s about so much more than that. It’s learning about where our food comes from and what food I put in front of my family. It’s about food that doesn’t have to be complicated to be delicious. It’s about knowing how to pronounce everything we eat, knowing what season our food is available locally, and understanding the relationship we as Canadians have with this bountiful country of ours. It’s about sharing that knowledge with my readers.

It’s why I threw my kids in a car a few years ago and made off for the east coast for a month. Stopping at farms, fields, fromageries and fisheries along the way.

In Italy I had the opportunity to stop at an organic wheat mill and meet a family who proudly continues their family tradition in Val d’Orcia, Tuscany. The pride the family members all had in the products really struck home with me (not to mention the overflowing bowls of pasta they kept putting in front of us.) Passion & simple ingredients. Flour, eggs and water. No magic. I knew that one of my gifts for my kids from Italy would have to be some ’00’ flour to make them some fresh pasta at home.

DSC_0080a

I’ve never made pasta before so I turned to my friends at KitchenAid for some help with this. They sent me their Gourmet Pasta Press which took a lot of the pressure off. There was enough worry about making pasta for the first time for my three kids without having to be concerned about forming the pasta too! It just pops on the end of my stand mixer and forms the pasta dough into fun shapes.

DSC_0091a

Making pasta from scratch really isn’t that difficult, and if you’ve got a mixer to get the dough started then it’s strikingly simple. Easy. Simple. Delicious. Right up my alley. You don’t need a pasta press to form the pasta but it will make it incredibly easy to create complex shapes like bucatini or rigatoni that would be impossible with a simple pasta roller.

I decided to throw one of my favourite recipes for a ragu of shredded beef short ribs in the slow cooker that morning so that I could focus on just making the pasta for dinner. I got my kids involved helping me knead the dough and feed the pasta press. Everything turned out perfectly – I great homage to my visit to Italy and a great eye opener for my kids who just assumed pasta was born in plastic bags at the grocery store.

KitchenAid and I would love to give one of my Canadian readers a pasta press. A chance for you to give homemade pasta a try at home. Simply tweet out your family’s favourite shape of pasta and be sure to include @gavmartell and @kitchenaid_ca

Winner will be chosen by random number generator on March 20, 2015

Contest winner: Kat Inokai. Congrats!

inaction

Grilled Artichoke Hearts

art1
We’re big artichoke fans in our house. It’s funny how people who’ve never tried them before look at you like you’re from Mars when you bring them out. We usually trim the prickly outer leaves, boil them up whole, and then eat them one leaf at a time with a tasty dipping sauce.
Occasionally though I’ll spend the time to make this delicious recipe for grilled artichoke hearts.
They’re a bit more work than the standard but oh, so worth it!
art2

******************************************


Grilled Artichoke Hearts 

Serves: 6Ingredients:

6 large artichokes, 10 to 12 ounces each
Juice of 1 lemon
2 tablespoons extra-virgin olive oil
1/2 teaspoon kosher salt
Preparation:

  1. Bring a large pot (8 to 10 quarts) of salted water to a boil. Prepare the artichokes by snapping off the dark outer leaves until you expose the yellowish leaves with pale green tips.
  2. Lay each artichoke on its side. With a sharp knife cut off the remaining leaves just above the base. Using a small teaspoon, scoop out the fuzzy choke. Cut the base of each artichoke in half lengthwise, through the stem, and then trim the stem, leaving about 3/4 inch attached.
  3. Using a small, sharp knife or vegetable peeler, trim and smooth the rough and greenish areas around the base. Trim about 1⁄16 inch all the way around the stem to expose the tender part of the stem.
  4. After each artichoke heart is trimmed, place it into a large bowl mixed with lemon juice (to prevent discoloration). Drain the artichoke hearts and cook them in the boiling salted water until you can pierce them easily with a knife, about 10 to 12 minutes, but don’t overcook them.
  5. Drain the artichokes in a colander and place in a large bowl. While still warm, add the oil and salt. Toss gently to coat the artichokes.
  6. Preheat the over Medium heat, and brush the cooking grates clean. Lift the artichoke hearts from the bowl and let any excess oil drip back into the bowl. Grill the artichokes with the lid closed as much as possible, until warm and lightly charred, about 4 to 6 minutes, turning them once or twice. Serve warm.